Monthly Archives: December 2013

Laser Beams & Stuff

December 20, 2013

The week started off with a visit to a laser cutting company in Portland to pick up our prototypes of the wedge-mount system.  Our design calls for 1/2″ aluminum, but unfortunately they can only laser cut up to 3/8″, so the prototypes are slightly smaller than the final product.  Still, it’s good enough to test the profile on a variety of different rack shapes and sizes.  We don’t expect to use laser cutting in production, but it’s the easiest and fastest way to get a small run of only 4 pieces.  Debbie, our sales rep, was nice enough to provide a tour of the facility and let us take some pics.

IMG_4646

IMG_4663

IMG_4651

It was pretty cool to see what they can do with laser cutting.  They made these beer taps:

IMG_4674

And this really intricate piece, whatever it is:

IMG_4679

Our 4 little parts seems pretty simple by comparison

IMG_4683

As soon as we got back to Hood River we ran around town to try them out on all our friends’ bikes to test the fit.

Hepco Becker: Check

IMG_4771

Wolfman: Check

IMG_4774

Andy Strapz: Check

IMG_4779

Happy Trails: problem

IMG_4782

We didn’t account for the powder-coating on Happy Trails racks, which adds some width.  A few strokes with a file was enough to fix the problem.  We’ll widen the design on our next round of protos.

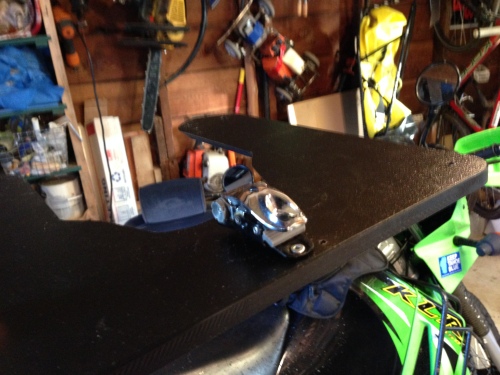
Once we knew they’d fit, we headed up to Schlosser Machine in Hood River to have them drilled and tapped.

IMG_4787

IMG_4788

IMG_4807

The finished product works great.  Cost may be a concern: these 4 little prototypes cost us over $100 to make between laser cutting and drilling/tapping.  Even the 1,000 piece quote we requested was pretty high considering that 8 of these parts would be included with every pannier set.  For a real production quote, we need to decide whether the finished product will be machined, water-cut, laser-cut, or extruded.  We also need to decide whether to use aluminium or stainless steel.  As with everything on this project so far, at this stage we’re designing for the best possible product without making any compromises for cost.  The cost part we’ll figure out later.  For now, we’re just happy to have a part that works.

Molle Attachments

With Chip taking a few weeks off, I decided to take a shot at making a bottle holder prototype myself.  I received a sewing machine as a gift a few years ago but so far I’ve only used it for small fabric repairs.  I’ve learned a lot by watching Chip over the last few months and I wanted to try it out.  Once I figured out how to thread the machine I really enjoyed it.  It’s kind of like welding… but with fabric.

IMG_4715

First I laid out the top of the holder in ripstop material and made a channel for the drawstring:

mosko-moto-bottle-holder-122013

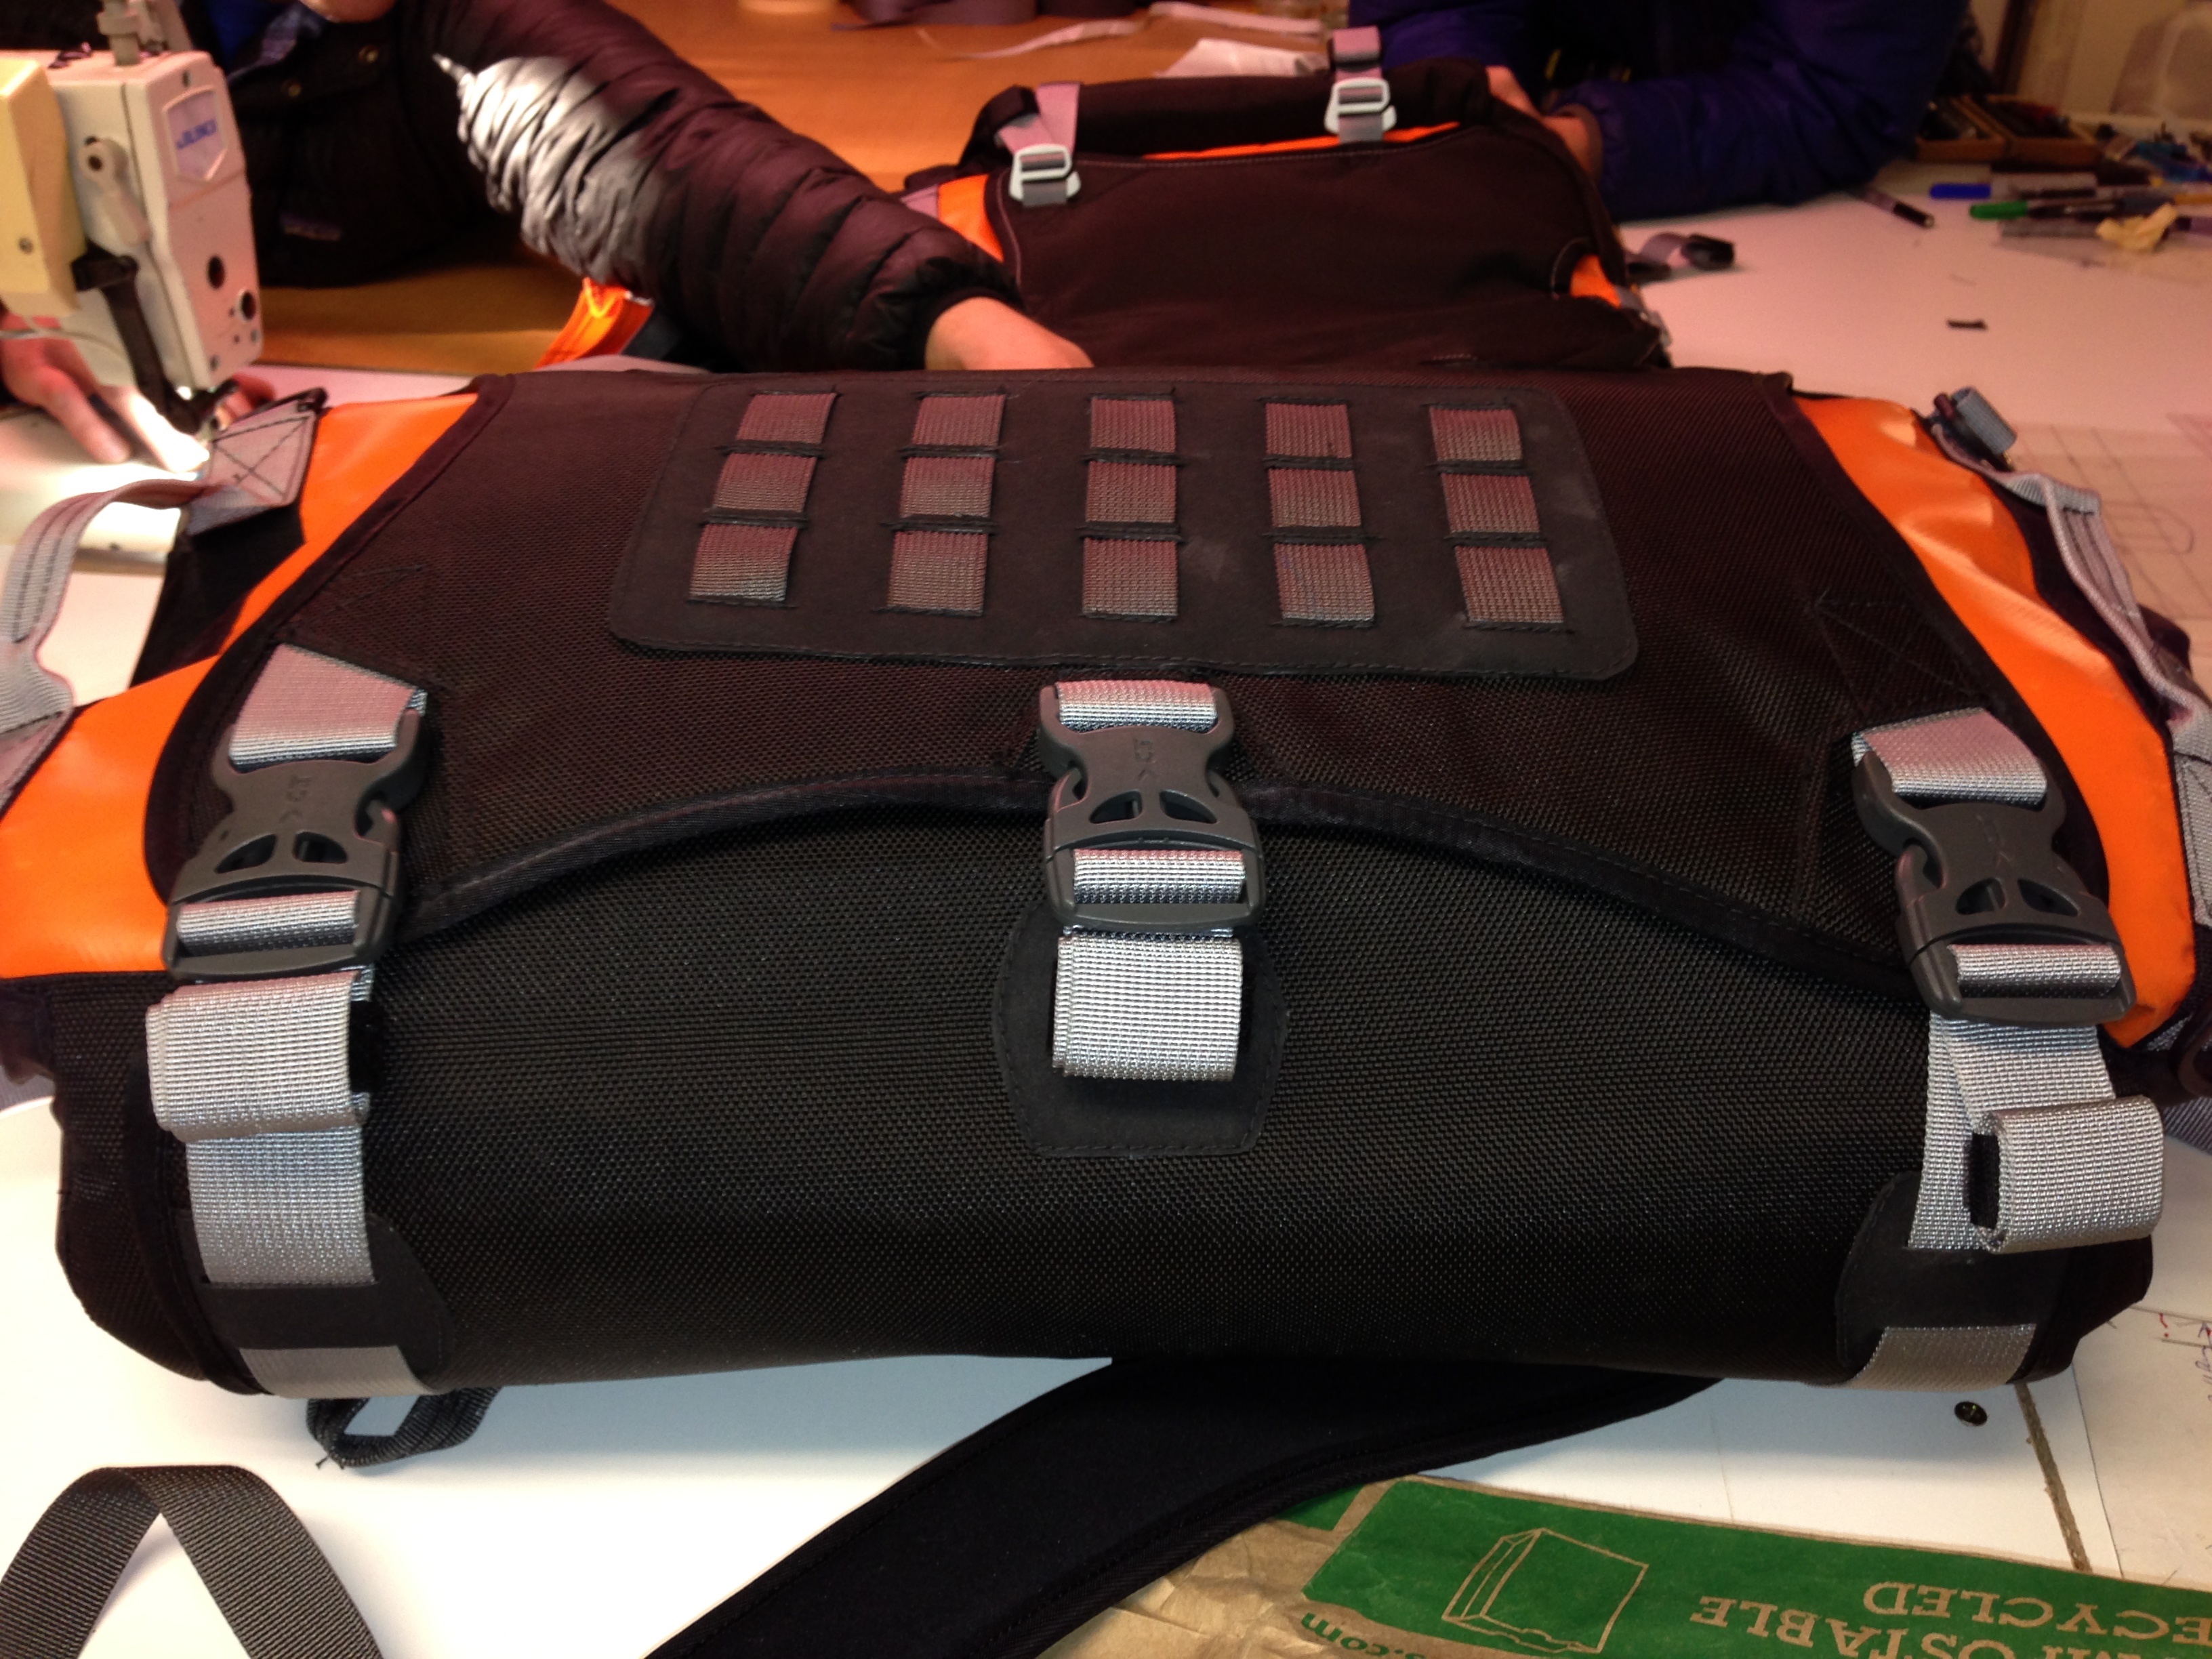
Then I sewed the ripstop to the body material (a cordura-type material), laid out the 1″ molle webbing, and sewed it on in 1.5″ increments:

IMG_4721

Then I pinned the bottom to the body and sewed it around in a circle, which was kind of tricky:

IMG_4724

My first-ever start-to-finish sewing project.  This will give us something to take up to Chip’s next week to have a real prototype made.

IMG_4729

IMG_4730

Next, we wanted to do a mockup of our hydration pouch.  We debated whether to design around a) a “standard” hydration bladder or b) our “favorite” hydration bladder, which is the MSR Dromedary.  I’ve been using dromedaries for moto camping for 3-4 years and I really like them.  They’re so durable that I throw them right in my panniers without worrying about leaks.  In camp, I hang them off the handlebars and use the flip-open nozzle like a spigot for washing, cooking, etc.  They also sell a shower attachment and a hydration hose attachment. However, if we make the hydration pouch from a ballistic nylon then the dromedary might be kind of overkill.  Also it’s a weird shape.  Plus pretty much everyone already has a standard bladder whereas only a few people actually have dromedaries.  Right now we’re leaning toward accommodating both systems.  We can “suggest” the MSR dromedary but design a pouch that works for either.

The MSR dromedary

mosko-moto-hydration-122013

Three-way nozzle

mosko-moto-hydration-122013

A flap opening in our hydration pouch for the nozzle.  So the rider can refill a hydration pack or get water for cooking/cleaning without having to remove the water from the pannier.

IMG_4737

We want the same molle hydration pouch to work on both the pannier and duffle.  On the duffle, it could potentially replace a hydration backpack.  The rider can tuck the hose into the beavertail and reach back for it when needed.

mosko-moto-hydration-122013

mosko-moto-hydration-122013

Moto Apparel

Galen has been working on the apparel concepts.  We decided to go with a more athletic fit and dramatically reduce the number of seams, fabric blocks, and pockets versus the other jackets we’ve seen.

mosko-moto-pants-122013

Galen knows how to make patterns and sew, in addition to designing on the computer.  So we discussed the possibility of mocking up some initial prototypes here in the states, similar to what we’ve been doing with bags.  He has designed a huge number of jackets in his career and he has a big library of past designs stored away in vacuum sealed bags which we can reference as needed for fabrics, hardware, and features.

There are literally hundreds of jackets in these bags:

mosko-moto-jacket-122013

mosko-moto-jacket-122013

One of the first jackets Galen designed and sewed in school:

mosko-moto-jacket-122013

Now that we’re feeling pretty good about the high-level line drawings, Galen is going to flush out more of the internal features and we’ll begin working on specs and fabrics.  Lots more to come on that front.

Box of Bags

December 13, 2013

Our box of bags is off to the factory, complete with patterns, part lists, colorways, and prototypes.  Shipping cost $320: ouch.  The UPS lady looked at me like i was nuts for buying $2,000 of insurance on two bags.  But hey, that was a lot of work.

We made one last revision before sending: adding a layer of hypalon behind the wedge to protect the bag from abrasion.  Our prototypes were already showing wear in that area from test rides.  So we traced the wedge on hypalon and made a quick last-minute pattern for the factory.

IMG_4545

The Wedge

Over the last few weeks of testing we accumulated a long list of wedge revisions.  Some key changes:

  • Made it longer to accommodate more rack sizes (so far we’ve tested it on hepco becker, happy trails, and wolfman).
  • Tightened the tolerance for a tighter fit.
  • Removed some material to reduce weight.

IMG_4551

moskoC revis from andrew

The changes were delivered to Hein, who will model and machine our next round of prototypes hopefully next week.

IMG_4558

Wedge Attachment

For the attachment system, we received a whole bunch of new buckles in the mail this week and we have two favorites.  

1) the rubber “jeep-hood-style” latch: we like the simplicity, one-step closure, and lack of any moving parts to get gummed up by sand or mud.

IMG_4554

2) stainless twist-style draw latch: it’s bomber, low profile, and has a nice draw feature which tightens the wedge firmly into the frame.  However we’re concerned about how well it will work when dirty.

IMG_4555

Molle System

We want the option of storing tools/tubes, extra fuel, and water all on the outside of the pannier.  We like having quick access to these items, and we don’t necessarily want them packed in the same dry bag as our sleeping kit and clothes.

For fuel, we’re developing a bottle holder that can either a) be attached on its own or b) be attached to a second bottle holder and the pair attached together.  Something like this (shown with one bottle):

IMG_4560

For water, we want a pouch that can either a) hold a standard hydration bladder or b) be used as a stand-alone removable pocket.  We took a tactical molle hydration pouch/bladder combo we bought online and cut them down to a 2l size.  With 2l on each pannier, 2l on the duffle, and 2l in a hydration pack the rider could hypothetically carry up to two gallons of water spread evenly over the bike.  That’s enough for two consecutive nights of unsupported camping.

IMG_4580

IMG_4589

The hydration pouch and fuel holders will attach to the molle panels using molle sticks, as shown below.  More on molle sticks here (http://www.youtube.com/watch?v=W3hvU6yueXQ).

IMG_4574

Tools/tubes would go in the built-in external pocket (which also fits fuel bottles or a hydration bladder if needed.  or a six pack).  Here’s what the pannier looks like packed with water, gas, clothes, and tools.

IMG_4602

IMG_4616

IMG_4611

Rackless Pannier/Duffle

With the pannier and duffle off to the factory we’ll finally have more time to focus on our rackless option over the next few weeks.  This week we had a little time to work on sketches between other projects.  We’re still leaning toward the idea of a harness system for drybags.  Next step: patterns and protos.

IMG_4625

Apparel

We met with Galen to make some revisions to last week’s line drawings.  Galen has Apple TV, so we can hang out in his living room and design on his flat screen TV, which is sweet.

IMG_4628

We’re looking to our favorite outdoor brands (like Arc’ Teryx and Patagonia) for inspiration.

IMG_4631

We like these fancy waterpoof zippers, like the Aquaguard from YKK (http://www.ykkfastening.com/products/zipper/vislon_zipper/aquaguard_vislon.html).  These don’t require a wind flap and they have better longevity than typical sealed zippers.

IMG_4634

I learned what a “zipper garage” is.

IMG_4639

Also learned the difference between a raglan (http://en.wikipedia.org/wiki/Raglan_sleeve) and a set-in sleeve (http://www.wisegeek.com/what-is-a-set-in-sleeve.htm).  We like set-in.

Apparel design is a lot different from bags.  It’s frustrating not to touch, feel, and sew in real-time.  I picture us spending a lot of time in a factory sample room next year.  Galen knows a good factory in Vietnam, so we’ll reach out to them as soon as these high-level line drawings are done.

Snow Place Like Home

December 6, 2013

Here’s what it looks like at my house this morning.  Anybody in the Gorge have a heated shop we could use for the next few months?  Will trade moto luggage for heat.

IMG_4496

Production Patterns

Our primary goal this week is to get our prototypes and patterns off to the factory.  First we made a new set of prototypes, which were near duplicates of the ones we tested last week except that we replaced the d-rings with daisy chains.  Next we worked with Chip to tweak some problem areas in our patterns for production.  Chip uses a plastic-bag-type material to test the way the seams join and make sure everything comes together smoothly.

IMG_4416

When the pattern tweaks were complete, we traced our paper patterns onto mylar material and drew out all the features (like webbing, buckles, etc) so the factory can see where they will go.  We used pins to hold down the patterns and ensure all the seams and webbing placements connect.

IMG_4449

Here’s what the pannier pattern package looks like:

IMG_4460

IMG_4464

Wedge Attachment System

Next we moved on to the attachment system for the wedge.  We had a number of ideas that we wanted to test.

First we experimented with some ski boot and snowboard bindings which we pilfered from old gear.

IMG_4343

IMG_4340

Then we routed out a spot for a ladder strap to mount:

IMG_4358

IMG_4361

IMG_4366

IMG_4351

This system worked ok, but there was not enough clearance behind the pannier rack to properly operate a ratchet, at least not the one we were using.  Plus the process of getting the ladder inserted into the ratchet was clumsy.

Next we experimented with straps and buckles:

IMG_4348

IMG_4369

IMG_4373

This last photo, with a simple side release buckle, was our favorite system out of the various things we tried.  We also ordered a bunch of other latches for testing off the internet.  Some examples:

Jeep Hood Latches:

IMG_4393 31qVI90kxBL._SL500_AA300_

Cooler Latch

70923_01_4448_front_042712_1000x1000

Webbing Keepers

Earlier in the development process we looked at several different webbing storage solutions including web dominators, clips, and systems used in outdoor backpacks.  We like the idea of a sewn-on keeper, something similar to a web dominator but which doesn’t involve a separate plastic/elastic part.  Here’s how it works:

The velcro is sewn onto the end of the strap:

IMG_4423

You roll the strap around the velcro until you get to the buckle:

IMG_4424

IMG_4425

When you reach the buckle, the two pieces of velcro are wrapped around the rolled up strap AND the compression strap itself, holding the excess webbing firmly in place.

IMG_4426

You also have the option of not wrapping the velcro around the compression strap and leaving the rolls hanging, like in the photo below.  Either way, it’s a lot cleaner than having loose straps flying around in the wind.

IMG_4429

While velcro is not a perfect material, it has the advantage that it’s light and handy, and can be easily removed/repaired/replaced at home.

Waterproof Liner Handle

We also added a simple closure & carrying handle to our pannier liner so it can be removed from the pannier to take into a tent or hotel room if the pannier itself is too muddy.

IMG_4437

Dualsport Outerwear

Galen finished the first line drawings of our outerwear system.  It features 3-layers:

1) a fully waterproof and vented outer shell, and

2) a waterproof liner jacket with a removeable hood, to be used under the shell for heavy/extended downpours, and which also works as a standalone rain jacket to use around camp etc., and

3) a mesh under-jersey which includes an armor suspension system.  This would be a more comfortable version of a pressure suit, for longer multi-day trips.

The layering system offers a lot of flexibility for different riding conditions.  If it’s hot and raining, wear the jersey with the rain liner/jacket only.  If it’s cold and raining, wear the outer shell, the rain liner, and the jersey.  If it’s sweltering hot and dry, wear just the jersey with the armor in it.  For a day ride, put the armor in the jacket and leave the jersey and rain liner at home.  These drawings are just for the jacket/pants, the armored jersey is coming next week.

IMG_4491